Pages

Saturday 23 July 2016

Understanding Aperture – A Beginner’s Guide

Aperture is one of the three pillars of photography, the other two being ISO and Shutter Speed. Without a doubt, it is the most talked about subject, because aperture either adds a dimension to a photograph by blurring the background, or magically brings everything in focus. In this article, I will try to explain everything I know about aperture in very simple language.

American Robin
NIKON D300 @ 340mm, ISO 200, 1/320, f/5.6
Before reading any further, I highly recommend reading about what a DSLR camera consists of.

1) What is Aperture?

Simply put, aperture is a hole within a lens, through which light travels into the camera body. It is easier to understand the concept if you just think about our eyes. Every camera that we know of today is designed like human eyes. The cornea in our eyes is like the front element of a lens – it gathers all external light, then bends it and passes it to the iris. Depending on the amount of light, the iris can either expand or shrink, controlling the size of the pupil, which is a hole that lets the light pass further into the eye. The pupil is essentially what we refer to as aperture in photography. The amount of light that enters the retina (which works just like the camera sensor), is limited to the size of the pupil – the larger the pupil, the more light enters the retina.
So, the easiest way to remember aperture, is by associating it with your pupil. Large pupil size equals large aperture, while small pupil size equals small aperture.

2) Size of Aperture – Large vs Small Aperture

The iris of the lens that controls the size (diameter) of the aperture is called “diaphragm” in optics. The sole purpose of the diaphragm is to block or stop all light, with the exception of the light that goes through the aperture. In photography, aperture is expressed in f-numbers (for example f/5.6). These f-numbers that are known as “f-stops” are a way of describing the size of the aperture, or how open or closed the aperture is. A smaller f-stop means a larger aperture, while a larger f-stop means a smaller aperture. Most people find this awkward, since we are used to having larger numbers represent larger values, but not in this case. For example, f/1.4 is larger than f/2.0 and much larger than f/8.0.
Take a look at this chart (image courtesy of Wikipedia):
F-numbers
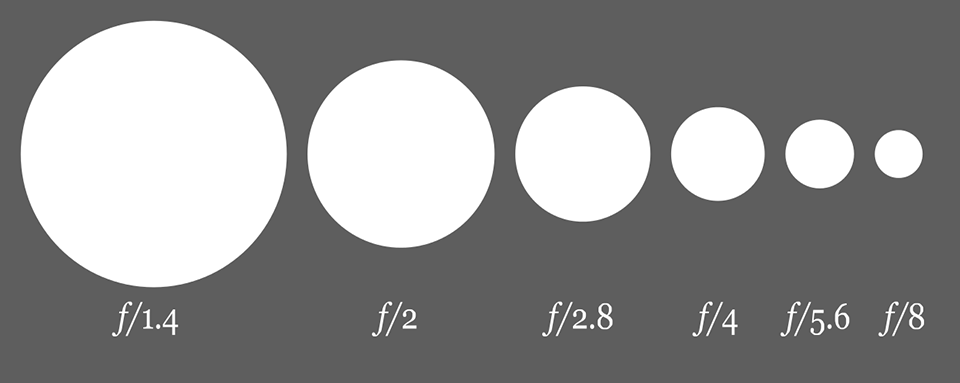
The size of the circle represents the size of the lens aperture – the larger the f-number, the smaller the aperture.

3) What is Depth of Field?

One important thing to remember here, the size of the aperture has a direct impact on the depth of field, which is the area of the image that appears sharp. A large f-number such as f/32, (which means a smaller aperture) will bring all foreground and background objects in focus, while a small f-number such as f/1.4 will isolate the foreground from the background by making the foreground objects sharp and the background blurry.
Depth of Field
As you can see, just changing the aperture from f/2.8 to f/8.0 has a big effect on how much of WALL-E is in focus and how visible the background gets. If I had used a much smaller aperture such as f/32 in this shot, the background would be as visible as WALL-E.
Another example:
Mailboxes
NIKON D700 @ 48mm, ISO 200, 1/1600, f/2.8
In the above example, due to the shallow depth of field, only the word “Cougar” appears sharp, while everything else in the front and behind of that word is blurred. If I had used a larger aperture such as f/1.4 and focused on one of the letters, probably only that letter would have been sharp, while everything else would have been blurred out. The larger the aperture, the smaller the area in focus (depth of field).

4) Lens Apertures: Maximum and Minimum

Every lens has a limit on how large or how small the aperture can get. If you take a look at the specifications of your lens, it should say what the maximum (lowest f-number) and minimum apertures (highest f-number) of your lens are. The maximum aperture of the lens is much more important than the minimum, because it shows the speed of the lens. A lens that has an aperture of f/1.2 or f/1.4 as the maximum aperture is considered to be a fast lens, because it can pass through more light than, for example, a lens with a maximum aperture of f/4.0. That’s why lenses with large apertures are better suited for low light photography.
The minimum aperture is not that important, because almost all modern lenses can provide at least f/16 as the minimum aperture, which is typically more than enough for everyday photography needs.
Nikon 50mm f1.4 AF-S
There are two types of lenses: “fixed” (also known as “prime”) and “zoom”. While zoom lenses give you the flexibility to zoom in and out (most point and shoot cameras have zoom lenses) without having to move closer or away from the subject, fixed or prime lenses only have one focal length. Due to the complexity of optical design for zoom lenses, many of the consumer lenses have variable apertures. What it means, is that when you are fully zoomed out, the aperture is one number, while zooming in will increase the f-number to a higher number. For example, the Nikon 18-200mm lens has a variable maximum aperture of f/3.5-f/5.6. When zoomed fully out at 18mm, the lens has an aperture of f/3.5, while when fully zoomed in at 200mm, the lens has an aperture of f/5.6. The heavy, professional zoom lenses, on the other hand, typically have fixed apertures. For example, the Nikon 70-200mm f/2.8 lens has the same maximum aperture of f/2.8 at all focal lengths between 70mm and 200mm.

Why is this important? Because larger maximum aperture means that the lens can pass through more light, and hence, your camera can capture images faster in low-light situations. Having a larger maximum aperture also means better ability to isolate subjects from the background.
If you have any questions, comments or feedback, please post them in the comments section below.

Understanding ISO – A Beginner’s Guide


It is challenging to take good pictures without a good understanding of how ISO works and what it does. Camera ISO is one of the three pillars of photography (the other two being Aperture and Shutter Speed) and every photographer should thoroughly understand it, to get the most out of their equipment. Since this article is for beginners in photography, I will try to explain ISO as simple as I can.

Before we go any further, you should first understand how DSLR cameras work.

1) What is ISO?

In very basic terms, ISO is the level of sensitivity of your camera to available light. The lower the ISO number, the less sensitive it is to the light, while a higher ISO number increases the sensitivity of your camera. The component within your camera that can change sensitivity is called “image sensor” or simply “sensor”. It is the most important (and most expensive) part of a camera and it is responsible for gathering light and transforming it into an image. With increased sensitivity, your camera sensor can capture images in low-light environments without having to use a flash. But higher sensitivity comes at an expense – it adds grain or “noise” to the pictures.
Take a look at the following picture (click to open a larger version):
ISO 200 and ISO 3200 Comparison
The difference is clear – the image on the right hand side at ISO 3200 has a lot more noise in it, than the one on the left at ISO 200.

Every camera has something called “Base ISO“, which is typically the lowest ISO number of the sensor that can produce the highest image quality, without adding noise to the picture. On most of the new Nikon cameras such as Nikon D5100, the base ISO is typically 200, while most Canon digital cameras have the base ISO of 100. So, optimally, you should always try to stick to the base ISO to get the highest image quality. However, it is not always possible to do so, especially when working in low-light conditions.

Typically, ISO numbers start from 100-200 (Base ISO) and increment in value in geometric progression (power of two). So, the ISO sequence is: 100, 200, 400, 800, 1600, 3200, 6400 and etc. The important thing to understand, is that each step between the numbers effectively doubles the sensitivity of the sensor. So, ISO 200 is twice more sensitive than ISO 100, while ISO 400 is twice more sensitive than ISO 200. This makes ISO 400 four times more sensitive to light than ISO 100, and ISO 1600 sixteen times more sensitive to light than ISO 100, so on and so forth. What does it mean when a sensor is sixteen times more sensitive to light? It means that it needs sixteen times less time to capture an image!

ISO Speed Example:
ISO 100 – 1 second
ISO 200 – 1/2 of a second
ISO 400 – 1/4 of a second
ISO 800 – 1/8 of a second
ISO 1600 – 1/16 of a second
ISO 3200 – 1/32 of a second


In the above ISO Speed Example, if your camera sensor needed exactly 1 second to capture a scene at ISO 100, simply by switching to ISO 800, you can capture the same scene at 1/8th of a second or at 125 milliseconds! That can mean a world of difference in photography, since it can help to freeze motion.

Take a look at this picture:
Black Skimmers
NIKON D700 @ 420mm, ISO 800, 1/2000, f/5.6

I captured these Black Skimmers at 1/2000th of a second at ISO 800. My camera sensor only needed 1/2000th of a second to fully capture this photograph. Now what would have happened if I had ISO 100 on my camera instead? My sensor would have needed 8 times more time to capture the same scene, which is 1/250th of a second. At that speed, I would have introduced motion blur into my picture, because the birds were moving faster than that. In short, I would have ruined the picture.

2) When to use low ISO

As I’ve said above, you should always try to stick to the lowest ISO (base ISO) of your camera, which is typically ISO 100 or 200, whenever possible. When there is plenty of light, you should always use the lowest ISO, to retain the most detail and to have the highest image quality. There are some cases where you might want to use low ISO in dim or dark environments – for example, if you have your camera mounted on a tripod or sitting on a flat surface. In that case, bear in mind that your camera will most likely need more time to capture the scene and anything that is moving is probably going to look like a ghost.
Oh No! It's a GHOST ATTACK!
Just kidding, of course! That’s my lovely nephew being the subject of my long exposure test. I set the camera to the lowest ISO to retain the detail, which also resulted in a long exposure of 5 seconds. My nephew sat still, while my friend stepped in for a brief moment to introduce the ghost :)

3) When to increase ISO

You should increase the ISO when there is not enough light for the camera to be able to quickly capture an image. Anytime I shoot indoors without a flash, I set my ISO to a higher number to be able to capture the moment without introducing blur to the image. Other cases where you might want to increase ISO are when you need to get ultra-fast shots, like the bird picture I posted above. But before increasing the ISO, you should think if it is OK for you to introduce noise to the image.

On many of the newer DSLRs, there is a setting for “Auto ISO”, which works great in low-light environments. The beauty of this setting, is that you can set the maximum ISO to a certain number, so when the ISO is automatically increased based on the amount of light, it does not cross the set barrier. So, if I want to limit the amount of grain in my pictures, I typically set the maximum ISO to 800.
If you have any questions, comments or feedback, please post them in the comments section below. Please note that the above explanation of ISO is given in very basic/simple terms, similar to film sensitivity. Correctly defining ISO in digital cameras can get fairly complex. If you want to find out more about ISO in digital cameras, including the ISO 12232:2006 standard, please see this article from Wikipedia.